Optimizing SpringBoot container images
A quick guide to create and containerize a Spring Boot lean jar.
While SpringBoot provides a quick and battle-tested way to create a standalone web application(s), the final packaging may be overwhelming for certain scenarios as everything is bundled in a single artifact.
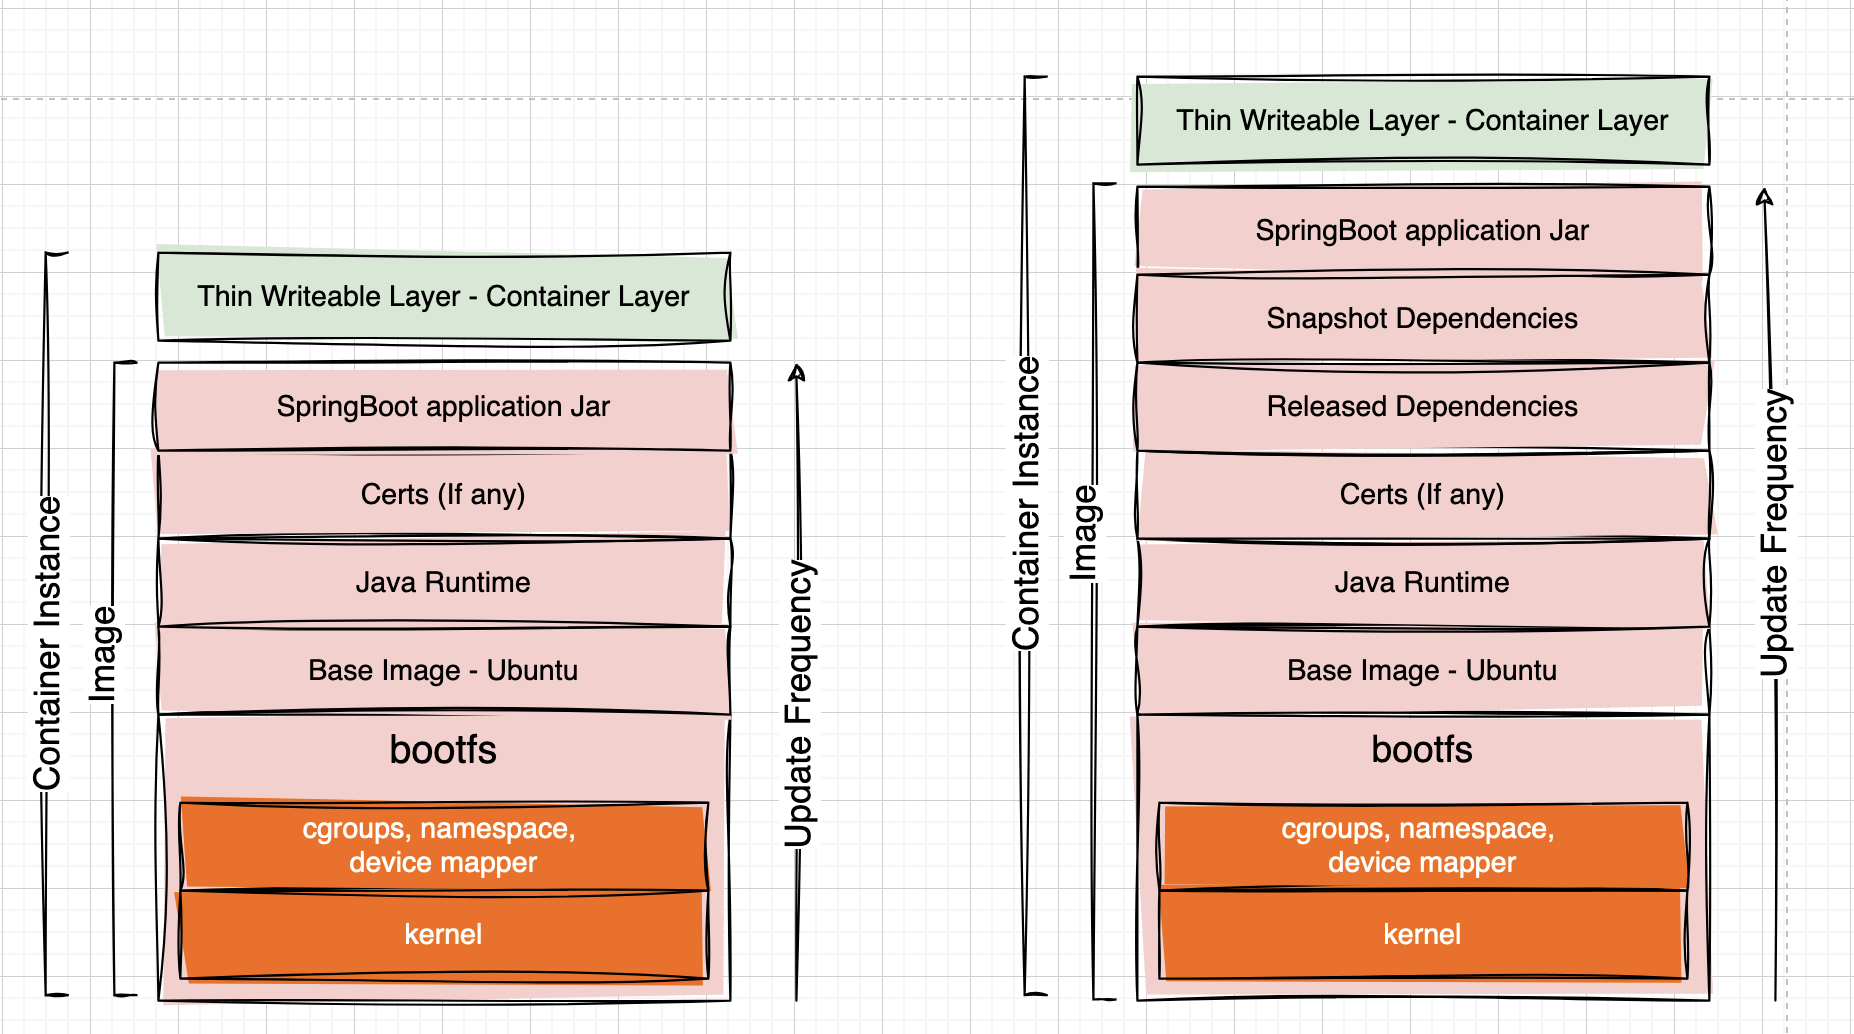
This structure becomes a significant challenge when working with containerized applications. One of the fundamental principles while working with containerized applications is - always keep the frequently changed parts of the application on the top of the image layer stack. It is because any changes in the lower level layers also require rebuilding all the images on top.
So if we keep the changes localized to only the top layer, we can re-use all the layers below the updated one.
But a springboot fat jar does not align with this approach. Any code changes are reflected as a change in the jar file, even though there were no changes in the springboot loader or any of the dependent jars packaged inside - assuming no snapshot jar versions are being used.
This, in turn, requires an image rebuild with the complete layer being rebuilt, including all those unchanged dependencies. Additionally, when we push the updated image to the remote repository, it cannot reuse any parts of the application layer as it was rebuilt.
Creating a lean jar
In order to reduce the number of items that need to be re-packaged every time there is a code change, we can extract the dependencies and core spring components to another layer that we can reuse in subsequent builds.
SpringBoot Lean Jar
One way to do it is to create a lean or thin jar. A lean jar contains the application code without the additional dependencies bundled together. This allows us to package all the dependencies in a separate layer compared to the application code layer, thus promoting re-usability.
We can implement this by including two additional plugins in our build section:
- maven-dependency-plugin: to copy all the dependencies to a user-defined location
- maven-jar-plugin: create a lean jar with the dependencies from the previous step in the classpath.
<plugin>
    <groupId>org.apache.maven.plugins</groupId>
    <artifactId>maven-dependency-plugin</artifactId>
    <version>3.3.0</version>
    <executions>
        <execution>
            <id>copy-dependencies</id>
            <phase>package</phase>
            <goals>
                <goal>copy-dependencies</goal>
            </goals>
            <configuration>
                <outputDirectory>${project.build.directory}/artifacts/dependencies</outputDirectory>
            </configuration>
        </execution>
    </executions>
</plugin>

<plugin>
    <groupId>org.apache.maven.plugins</groupId>
    <artifactId>maven-jar-plugin</artifactId>
    <version>3.3.0</version>
    <configuration>
        <finalName>${artifactId}-lean-${version}</finalName>
        <outputDirectory>${project.build.directory}/artifacts</outputDirectory>
        <archive>
            <manifest>
                <addClasspath>true</addClasspath>
                <mainClass>${main.class}</mainClass>
                <classpathPrefix>dependencies</classpathPrefix>
            </manifest>
        </archive>
    </configuration>
</plugin>
Once complete, the build will produce a new <app>-lean.jar in the target/artifacts directory. Additionally, a new folder target/artifacts/dependencies/ will be created containing all the dependent jars.
We can verify the final classpath by confirming the contents of the MANIFEST.MF file from the generated jar, which should point to the dependencies from the new location.
Manifest-Version: 1.0
Created-By: Maven JAR Plugin 3.3.0
Build-Jdk-Spec: 20
Class-Path: dependencies/spring-boot-starter-web-3.1.2.jar dependencies/
 spring-boot-starter-3.1.2.jar dependencies/spring-boot-3.1.2.jar depend
 encies/spring-boot-starter-logging-3.1.2.jar .....
Dockerfile changes
Once we have a lean jar referring to classpath entries on another location, we can update our Dockerfile to include the dependent and application jars (in order). It will ensure that only the topmost layer will be rebuilt in case of any application code changes.
FROM --platform=linux/amd64 openjdk:20-jdk-oracle

# metadata
LABEL MAINTAINER="sumit@jvmaware.com"

# workspace
WORKDIR /opt/app/sb-oapi

# add the dependencies
# make sure to use the correct target folder name(s)
# inside the image - matching the classpath entries
ADD ./target/artifacts/dependencies/ dependencies

# add the application jar
ADD ./target/springboot-lean-1.0.0.jar app.jar

# expose port
EXPOSE 8080

# execute the jar
ENTRYPOINT java -Xms1G -Xmx1536m -jar /opt/app/sb-oapi/app.jar
Depending on the order of Dockerfile instructions, we can ensure that the dependencies layer can be re-used.
Using SpringBoot layered jars
SpringBoot 2.3 improved support on cloud native
buildpacks. Additionally, it included support for layering a jar using a layers.idx file. The layers index file provides a list of layers and the parts of the jar that should be contained within them. Layers are written in the order that they should be added to the Docker/OCI image.
With a combination of springboot layered jar and a custom Dockerfile, we can achieve similar results:
<plugin>
  <groupId>org.springframework.boot</groupId>
  <artifactId>spring-boot-maven-plugin</artifactId>
  <configuration>
    <layers>
      <enabled>true</enabled>
    </layers>
  </configuration>
</plugin>
The high level steps involve:
- Create a layered jar
- Explode the contents and extract individual layers
- Update Dockerfile - if applicable.
This post lists down the steps required for this approach.
That is all for this post. If you want to share any feedback, please drop me an email, or contact me on any social platforms. I’ll try to respond at the earliest. Also, please consider subscribing feed for regular updates.